

Dynamics 365 portals support a variety of authentication schemes and are configured by default with a custom (forms-based) and Azure AD integrated login schemes. However, the Azure AD login scheme works only with the customer’s own Azure AD.
This article shows how to configure your Dynamics 365 portal to work with your customer’s or partner’s Azure AD without having to add them as guest users in your own Azure AD.
Pre-requisites
Performing this task will require the following:
- Portal Owner privileges
- Global Admin privileges on the tenant
Time required
The steps outlined in this task will take approximately 15 minutes.
Additional Notes
If you configure a custom domain and/or change your portal Base URL, these steps will need to be re-run, specifically step #3
Procedure


Supported Account Types: Accounts in any organizational directory (Any Azure AD directory - Multitenant)
Redirect URI:
Select ‘Web’ in the dropdown and enter your Portal base URL appended with ‘/signin-oidc’ in the text box.
E.g.: If your portal URL is ‘https://iotap.microsoftcrmportals.com/’ then the URL to be entered would be ‘https://iotap.microsoftcrmportals.com/signin-oidc’
Click on the ‘Register’ button.

4) Within the newly created App click on ‘Authentication’ menu on the left-hand side navigation. On the right-hand pane tick the below checkboxes and hit ‘Save’.
b. ID Tokens

5) Click on ‘Overview’ on the left-hand side navigation and copy the ‘Application (Client ID)’. This will be required later.

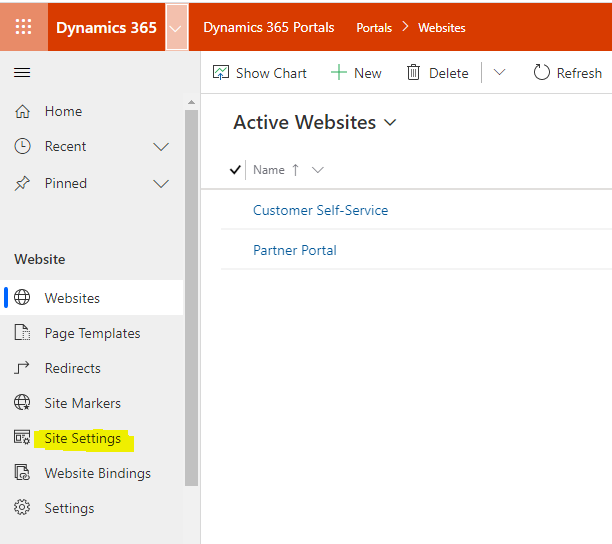
6) Open Dynamics 365 and navigate to Portals > Site Settings.
Create the following entries for this entity.
| Name | Value |
| Authentication/OpenIdConnect/CustomerAzureAD/Authority | https://login.windows.net/common |
| Authentication/OpenIdConnect/CustomerAzureAD/Caption | Customer Login |
| Authentication/OpenIdConnect/CustomerAzureAD/ClientId | [Use Application ID noted in step 3] |
| Authentication/OpenIdConnect/CustomerAzureAD/ExternalLogoutEnabled | True |
| Authentication/OpenIdConnect/CustomerAzureAD/IssuerFilter | https://sts.windows.net/*/ |
| Authentication/OpenIdConnect/CustomerAzureAD/RedirectUri | [See Notes below] |
| Authentication/OpenIdConnect/CustomerAzureAD/ValidateIssuer | False |
Notes:
If you configured multiple URLs, then choose the one that you wish the user to be redirected to when they logout of the portal.
E.g.: specifying https://iotap.microsoftcrmportals.com/signin-oidc will redirect the user to https://iotap.microsoftcrmportals.com/ upon logout, whereas specifying https://skyblue.microsoftcrmportals.com/signin-oidc will redirect them to https://skyblue.microsoftcrmportals.com/

8) Click on the “Customer Login” button and specify an Azure AD login (Work or School account) that is not part of your own Azure AD
A consent form is presented the first time whenever any customer logs in. Click on the ‘Accept’ to get into the Portal.

If the user has administrative privileges, they can choose to “Consent on behalf of the organization”, which suppresses the consent for other users from that organization.

9) Congratulations! Your Dynamics 365 Portal is now configured to work with your customers’ Azure AD.
Additional Configuration Parameters
Some additional but relevant options to consider under Portal Site Settings.
| Name | Recommended Value | Description | ||
| Authentication/Registration/AzureADLoginEnabled | False | Changing this value will affect the visibility of the “AzureAD” button on the sign-in page. Users from your own Azure AD can use the ‘Customer Login’ we created above to login to the Portal | ||
| Authentication/Registration/LocalLoginEnabled | False |
|
||
|
False |
|
||
|
Authentication/Registration/LoginButtonAuthenticationType |
https://login.windows.net/common | If this is set, the Sign In button on the Portal will directly take the user to the Office 365 login page. |